Building the snake game [part 1]
This is me trying to build some simples games. This one is the snake game, famous from old era, when phones were not smart, they were just phones. The snake game was the king, one of the best games available at the time. Below you’ll find my attempt to implement it using the Pyxel framework for Python.
Rev your engines
Yes! This is it, we are going to write our first game. This is going to be pretty simple (well, kinda…), as we are going to write the snake game. For every project in this blog, I’ll have a GitHub repository, and will try to structure the repo just like the posts, with incremental commits, so that you can follow along more easily. As the result of every post we will have a working version of the game, a little better the last version.
One important note to make is this one: I am not a professional game develpoper. And what does that mean? It means that probably I won’t make the best decisions about how to implement things. I am passionate about coding, have some experience in it, and I am now trying to build some games. If you think there is a better way to address some specific parts of the game, feel free to tell me in the comments. Please be kind, I like having constructive feedback.
Language and game engine
I really like Python as an introductory language to programming, so that’s the language we are gonna use. It’s free, open source and available for every major platform. Go check it out if you haven’t already. I’ll try to explain the code as much as possible, but it will be great if have a minimal programming experience. I’ll put links to interesting resources if I find it useful.
There are many game engines for Python, but Pyxel is growing on me. It’s a retro game engine for Python. Retro game engines are fun because they kindly impose somes restrictions, forcing you to build smaller, simpler games, resembling games from older platforms, but using modern technologies. This first game will also be used as a tutorial on how to use the basic features of Pyxel. So let’s get to it.
The game loop
As you might expect, games are programs, but not like any other. Some special logic happens so that the game can show you stuff on the screen and enable your interaction with it. Every game has what is called a game loop, which is just a regular loop, e.g. a while whose condition is always true. The game loop is responsible for handling the player’s input, updating the game state based on the input and redrawing everything on the screen according to the new game state. Something like this:

To create a game loop using Pyxel, you’ll need something like this (a variation of what you can find on the Pyxel docs):
1
2
3
4
5
6
7
8
9
10
11
12
13
14
import pyxel

class Game:
    def __init__(self):
        pyxel.init(120, 100)
        pyxel.run(self.update, self.draw)

    def update(self):
        pass

    def draw(self):
        pass

Game()
Understanding the code line by line
That’s as simple as you can get with Pyxel, and it is all plain Python code, so let’s understand it line by line. Line 1 imports the pyxel module, which contains most of what we need to write our game. Beginning on line 3 we have the declaration of the class Game. In object-oriented languages we have classes, which define the structure of objects. In simple terms, an object is an instance of a class, the concretization of the abstract structere define by its class. Here you’ll find a great explantion this concept. Go check it our and return when you think you are comfortable with the concept.
Lines 4, 8 and 11 define methods. The __init__ method is the Game class’ constructor. This is a special method, called everytime we need a new object (new instance) of the Game class. Line 5 calls the init method from the pyxel module, which defines the window size, 120 pixels in width and 100 pixels in height. pyxel.run actually starts the game loop implemented by the internals of the pyxel module. We provide it with our definitions of the methods update and draw. Whenever pyxel needs to update the game state it will call our method update (lines 8-9), and whenever it needs to redraw the screen our draw (line 11-12) method will be executed. This happens every frame, so if uor game runs at 30 frame per second (fps), the update and draw methods will run 30 times each, every second. Since we are not implementing any game logic yet, I used the pass statement, which is the Python construct for doing nothing. It is necessary here because python expects at least one valid statement inside a method’s body, otherwise it will throw an error. In Python we also need to provide a variable to receive the reference to the instance a method is called from. That’s the self you often see in the code snippet above. If you find that hard to understand, go back to [this](https://brilliant.org/wiki/classes-oop/ link.
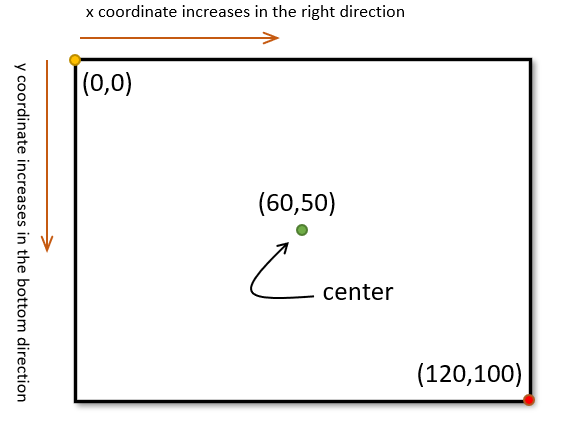
Before we try to move things on the screen, we need to understand Pyxel’s coordinate system. It is a regular Cartesian plane, where every position is represented by coordinate, composed of two components, the xand the y componentes. In simple terms, the x value determines the distance (in pixels) from the origin (point (0,0), depicted in yellow in the figure below), in the horizintal axis, the y value determines the distance (in pixels) to the origin in the vertical axis. In Pyxel’s coordinate system, the origin is located at the screen’s top left. The x component grows to the right from the origin and the y component grows to the bottom. In our example, the screen has 120 pixels in width and 100 pixels in height, so the center is placed on the point (60,50) (depicted in green in the figure below), and the furthest point from the origin is on the bottom right, which is our example is the point (120,100) (depicted in red in the figure below). One important thing to note is that the screen dimensions define the space where “things” are visible. The elements on your game can have coordinates that are not in the range of what is visible, which means that they won’t be drawn on the screen, but they will be there.
Let’s draw something on the screen
Now… that was not much fun, right? Let’s try something that at least moves…
1
2
3
4
5
6
7
8
9
10
11
12
13
14
15
16
import pyxel

class Game:
    def __init__(self):
        pyxel.init(120, 100)
        self.x = 0
        pyxel.run(self.update, self.draw)

    def update(self):
        self.x = (self.x + 1) % pyxel.width

    def draw(self):
        pyxel.cls(0)
        pyxel.rect(self.x, 20, 5, 10, 9)

Game()
We have something new in line 6. Here I am defining a class attribute called x. This variable will store the position of a square that will move one pixel to the right on every frame. The update method now does something: every frame the variable x will be updated with the current value plus 1. The % pyxel.width tells python to wrap the value of x based on the width of the screen (pyxel.width), since the modulus operator gets the remainder of the division. In our example, we have 120 pixels in width, so the value of x starts as 0, and every frame it gets added 1 unit. When it reaches the value of screen width it returns to 0, since the remainder of the division 120/120 is 0.
In the draw method, line 13 does an important thing: it sets every pixel on the screen to the color 0, which is black. Line 14 draws a rectangle by calling the method pyxel.rect, having its top left corner on the point (self.x, 20), 5 pixels in width, 10 pixels in height, color 9 (a shade of orange). Pyxel has a palette of 16 colors, ranging from 0 to 15.
On line 16 you see the call to Game(). This invokes the class’ constructor, the __init__ method. This is what really makes the game run, because only then its code will run. One important thing: pyxel.run(self.update, self.draw) must be the last line in the constructor. Any other code after this will not run, because at this point Pyxel takes control of the game’s execution.
So, you’ll see an orange square, 20 pixels from the top, moving to the right. Try it on your computer. The result of what we did here can be found on GitHub, under the tag v0.1.
Leave a comment